Sunday, May 9, 2021

On This Special Day....

...I Honor Thee

 It's been almost four months since we've lost our Mom.  

And those passing months have felt like an eternity.


We (my four siblings and I), are still dumbfounded,

unable to grasp how she was diagnosed with end stage liver failure.
There were no indications of her illness.  It happened so fast.

I'm still hearing those world crashing words...she's gone.


My mom was extraordinary.  We admired so how she built a new life.

In a whole new world. And made it look so easy.

My love of gardening comes from her.


With all the moving around we did, she always created a beautiful garden.  

She grew food, flowers and happy children.  

She taught us kindness and hard work by example.

Our relationship was never stressed but I would be remiss if I didn't
admit that at times, her unsolicited I-know-best advice
would cause me to roll my eyes.

(I bet my girls do that now!)  


It was tough living cross-country...not being able to spend time with her

other than a week's visit home, every other year or so.  But our early

morning calls kept us close.


She wanted the best possible life for her children
and she was so proud of us, and her grandchildren.

I've finally come to terms with our huge loss but just when
I think I have it all together, it takes but the merest thought of her
and the hot rush of tears quickly overcome me.


Then I remember where I acquired my inner strength. 
I smile and breathe a silent prayer.  Thank you, Mom.


Your voice, laughter and spirit will forever be with me.

I dedicate this loving post to my wonderful siblings,
Nancy, Homer, Glenn and Noel. 
And to my amazing daughters...Amanda and Emma.


Rest in Peace, Theu Prefontaine.

May 6, 1943 ~ January 16, 2021


Saturday, March 7, 2020

Soil Blocking 101

Happy March, gardening friends!  
Here in central NJ (zone 6b), signs of life are popping up everywhere...
especially in my dining room!

The majority of cold hardy annuals I planted in September/October
have been decimated by voles/moles...a problem I've never had before!
So, needless to say, I'm playing catch up and trying to crank out
a few thousand new baby plants.

The method that works best for me is called soil blocking.
If you've never heard of it...here's a quick How-To:
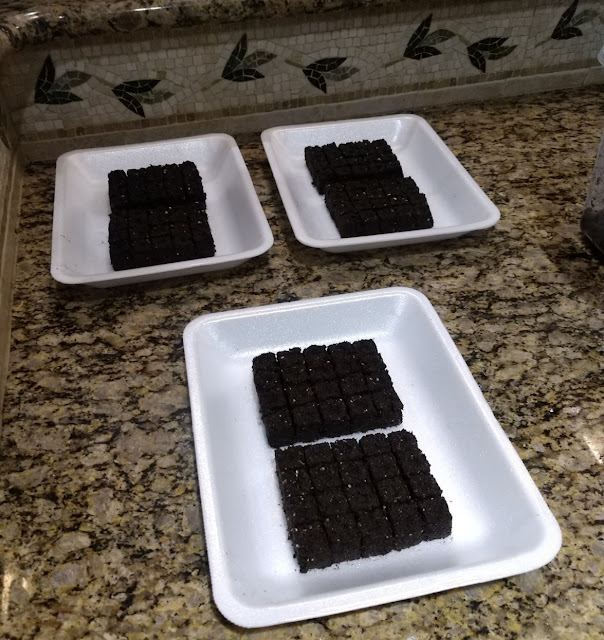
 You'll need a good seed starting mix, a soil block form, 
and some sort of tray that houses the seedlings and can hold water.
I use these styrofoam (meat) trays that friends recycle for me.  
They work great!
 Add water to potting mix until it's evenly moist but not too soggy!  
The form is then pressed firmly into the mix to fill in the 3/4" block molds.  
This model makes 20 mini 3/4" soil blocks per press.
 Position in place and pump the handle to release the blocks.  
These small trays will hold 40 seedlings. 
 I tend to seed 80/120 of each variety so that'll give me plenty of blooms to harvest.  
Succession seeding every two/three weeks throughout the season is a must
unless I'm buying in plugs from a nursery.  
You can't harvest flowers if you don't plant them!
 Plant names and dates are written right on the tray.  
The trays are then placed on heat mats.
Keeping the potting mix moist is key to good germination. 
 And always use freshest seeds possible.
Once I see germination, the tray then go under grow lights. 
Some seeds germinate in 2 days, others take a week or longer!
This is my 4th season of flower farming so
I've learned much through trial and error. 

 My grow room (read dining room) set up is just
a 6ft. tall/4ft. wide/5-shelf  rack from Home Depot 
with a few hanging shop lights....easy peasy, right?!

It's super important to water daily and not let the soil blocks dry out.
Weekly dose of fertilizer keeps these babies healthy and happy.
Amazingly, what you see above is about 1,800 seedlings 
in various stages of growth from the past 2 weeks.
The two bottom shelves hold 4ft heat mats and I actually have room
to add a 3rd light rack.
These more mature plants (that I bumped up into #50 trays) are hardening
 off on the deck.   They will be planted in their permanent home soon.  
Because they are winter hardy annuals, they'll be fine if
night temps dip in the low 30's.  
This bumping up step isn't necessary...I must've been bored..ha!
 
If you want to try soil blocking yourself, find info and products here!
https://www.thegardenersworkshop.com/ 

Lisa has been a great mentor since I started this flower farming journey
and if I can do it, you can too!  Have a great weekend!


Tuesday, February 4, 2020

Bulbs in Crates

With a break from our chilly February temps this past weekend, I made it my mission to finish planting the last stash of bulbs, which have been taunting me from the corner of the garage!

These are the crates that hold my bulk orders of fall bulbs.
One crate holds roughly 500 tulips.
They come in different sizes but these measure 16"x23" and are 9" deep...
which works best for my planting purposes.
I line the perimeter with at least 4-5 layers of newspapers...
a good use of your recyclables...
to prevent soil from leaching out of those slats.
Fill the bottom with at least 3" of a good potting mix.
I do like to add a handful of bone meal to boost growth.
Depending on the size and variety of the bulbs, you can really pack them in!
Notice these tulips have started to sprout but they are firm and healthy
so they will be just fine!
Then add a 5-6" layer of potting mix on top.
 I will add mulch or leaves if I have any on hand.
The crates are placed outside in the garden through the winter
and just do their thing.
With the occasional rain and snow, no extra watering is needed.
By mid-late April, I'm ready to harvest...

bulbs and all. 
Easy peasy, right?! 
Stems are cleaned, extra foliage removed, they get conditioned overnight
and are ready for use the next day.
Spent bulbs are composted as I treat them as annuals.
 Blooms harvested with tighter buds (but showing color) can be held
in my flower cooler for up to 3-4 weeks.  Once in water, they plump and
color up in a few days.  This storage method helps extend my season of
cut tulips into mid-late June.
This is a crate of Spanish Bluebells.  I planted 400!
 Aren't they pretty?  (Internet photo)
I hope you enjoyed this quick tutorial.  Leave a hello (or question) in the comments.
If you have limited garden space, give this process a try.
We were back to a snowy forecast the next day so I'm glad I got this over-due chore done!